Disclaimer

"Some of the products used on my blog may have been provided by the vendors mentioned in my posts."

Wednesday 21 December 2011

25


So this was the perfect theme for a Christmas tag and the perfect way to use my Halloween Alterations  Die, Candlelight Fright, in a different way.

I inked my tag with Barn Door and then clear embossed it all over with a baroque style design.  This month we are very fortunate to be sponsored by Penny Wise Arts who stock a massive range of beads and sparkles for crafters so I used their black glass micro beads over glossy accents to bring out the swirls in my embossed background.

I painted my candelabra with crackle paint and used beadazzles for my flames.  

The numbers are cut from Ranger's Foil Tape which was embossed using an embossing folder.  The foliage was cut using Festive Greenery alterations die and distressed with the damask embossing folder.  I cut the snowflake in acetate and used a Star Dust stickle around the edge.

A little bead trim and some ribbons completed my tag - all ready for the challenge and for Christmas.

Hope you and your families all have a very Merry Festive Time.  xx

Friday 9 December 2011

Dad


Cards for Men ... Don't you just hate trying to get some inspiration? (or is it just me?!!)  Half your stash is totally inappropriate ... hearts, flowers, beads, butterflies, fairies ... well I could just keep on going!  Even those men with a hobby must get tired of getting cards with golfers or mechanics on every year.   

My Dad's main hobby is restoring vintage cars but I did him a card with a car on last year - Tim Holtz's Old Jalopy to be precise so I needed to come up with something else.

Anyway, I decided to keep it simple and I'm actually really glad I did as I think this has worked out well.

I hope you agree ...

 x

Birthday Wishes Box

It's my Dad's birthday and there's absolutely nothing he wants!  We've exhausted all the clothing options, hobby supplies and theatre breaks so I decided that I would invest my time in creating his gift as my way to give him something special.

I have made him two batches of fudge - one chocolate and the other rum and raisin.  I bought an oval box from a local home store and although it was very nice, having a vintage photo of the Eiffel Tower, it has had a makeover!  

My Dad restores vintage cars as one of his hobbies and so that was my theme.

I painted the box with craft paint and then used stencils and Dylusions Sprays to create patterns and backgrounds (should have worn gloves and I now a couple of blue fingers!). 

I used images from the Dover 'Old-Time Transportation' CD to collage the box using Mod Podge.

I added the lace and spotty ribbon and used my Birthday Wishes stamp on the ribbon which came with the box.

I made a key fob with an old watch face and a circular tag from my stash (sourced from a garment I purchased).


All that remains is to fill the box with the fudge and send it to him.

Wednesday 7 December 2011

Small Planet


This week the  challenge at Gingersnap Creations is GC129: Starry Night.  Our very kind sponsor for December is Penny Wise Arts who have a great range of fantastic beads and other cool stuff to get your creative mojo going!!

The idea for this piece came to me in the middle of the night and I then had to work backwards to create it.  I had a small bag of swarovski crystals in my stash which are SO sparkly that I decided they had to be the start of my starry night.  As they had pointed backs, I decided to use mountboard so that I could embed the crystals and achieve a flat sky.

I downloaded my earth from the internet and then cut my skyline using inspiration from a combination of buildings from various cities including New York, London and Hong Kong. 

I made the hollows for the crystals before covering my mountboard with Glossy Accents and pouring the black micro beads all over.  Once dry, I fixed the stars in position.

The buildings are all angled away from the earth and held in position using 3D silicone glue (which is one of my newer and much loved products!)


The final step was the sentiment; I had an intuitive feeling about the message I wanted but not the words to describe it.  Solution: put the task out to my in-house Design Team (aka the children!) and after a bit of brainstorming the options, I had my finished wording ... small planet ...   Big World ....   (thanks Max!)

Hope you feel like getting starry eyed and joining in the fun!

Stay Cosmic ...  x


Thursday 1 December 2011

Every Life ...


I made this card for my brother's birthday.  Cards for men are always a challenge and my brother is no exception.  He's quite an 'off the wall' kind of character so I wanted something querky.  I found the image of the flying man and set about putting him into a context.

The line of cottages and tree are new stamps by Butterfly Kisses which I had in mind to make snowy shaker Christmas cards with.  However, they were also great for building this scene ...

I cut clouds from masking sheets and they brayered the background.  I stamped my cottages and coloured them in before fixing then to my card.  The tree and sentiment (Stampotique) were stamped directly onto the background.

I printed my flying man onto acetate and cut it to fit around the rooftops before sticking it down with a little glossy accents.  Voila! My man has taken to the skies for some peace and quiet!!

Hope it brings a smile to your face and also my brother's!

x

Tuesday 29 November 2011

Silent Night


This is my first Christmas card of the season. 

I have to say that I'm not a huge card maker (understatement of the year!!) and I certainly have no desire to turn out volumes of any one card (I'm strictly a one card and move on type of girl!). However, all that being said, I thought it may be fun to try and make a card that I could enter into various challenges and see how I got on.

I found this personal challenge put me into a total creative void mid afternoon and at the point of abandoning this idea.  However, this evening things started to fall into place and I'm actually really pleased with this card.

I think it's good to step outside your comfort zone and see what you can learn from trying something new.  I hope to continue this journey ...

Take care and keep crafty x

Monday 28 November 2011

The Girls


This week is a colour week at Gingersnap Creations and the challenge is GC128 Yellow, Red and Brown.  As we are also featuring livestock and farming this month, I knew this photo was perfect for the challenge.  These are 3 of the hens at the cottage we stay at in the Isle of Wight and they are just gorgeous!

I created my background with stencils, stamps, sprays and paints and I embossed little golden chicken feet criss-crossing the page which made me smile!


I used guilding flakes on the pencil tops for some glittery sheen and a jewelled swirl by prima for a bit more dazzle!!


The big butterfly is a stamp by Lost Coast Designs.  I stamped it onto old sheet music and dipped it in wax before colouring it with pastels and adding the wire antenna.


I hope my project has inspired you to enter this colour challenge - it's always great to see everyone's ideas.

x

Sunday 27 November 2011

Magical Paradise


The main rule of the challenge is no Red or Green and it is also a Stampotique Stamp Only challenge.  Some of the ingenious ways that their stamps have been used is really cool so if you've time, why not hop over and take a look?!

I've used the little starfish stamp to make my tree and I've perched the large star on the top which I doodled some swirls inside.  I used little dots of stickles to decorate my tree.

I wanted a really watery feel to my background and so I used watercolour paper and Neocolor II watercolour crayons which are absolutely fantastic to work with as they are so soft and full of pigment.  I spritzed the finished background with marshmallow glimmer mist to give it a soft glittery finish.


My mermaid and octopii (?) are coloured with alcohol inks and are raised from the background for a little dimension.

I had loads of fun dreaming up how to use my stamps for this challenge.  Maybe you will feel inspired to be a little un-traditional too?!!

x

Saturday 19 November 2011

Glass Bead Gel Tags

I have uploaded a tutorial onto the Gingersnap website to show how to make these tags.  

I love playing with messy stuff, and glass bead gel is so exciting!  I actually bought it from an online art retailer without knowing what it was or what I would do with it because it just sounded fun.  I wasn't disappointed as it is gorgeous stuff!


When wet, the gel is milky and the beads are hard to see but once it dries it is clear and the little glass beads are everywhere.  You can spray it with glitter, tint it with paint or spritz it with mica spray.

I decided to use it to create effects in apertures which I cut into large tags.

I made a seaside tag based around this lovely bathing beauty who I downloaded from Diva D'Este.

I created a wavy element at the bottom using the gel.


This butterfly tag has the gel all around the butterfly and is scuplted in swirls.  I decorated the tag with shimmer sprays, masks and paints.  The butterflies are beeswaxed and have idea-ology pen nibs for their bodies.  I used stamps by Lavinia stamps, Lost Coast Designs and Stampotique.


Thursday 10 November 2011

Halloween Postcard


I am currently doing a postcard exchange with a lovely group of ladies  which is running for 14 months.  We started in June and it's proving to be a lot of fun.  Some months we get to choose what we do and some months the recipient has expressed a preference.  Either way, it keeps you on your toes and it's lovely to see everyone's ideas and work.

For October the preference was bats so a Halloween theme was the obvious choice.  I used distress inks for the background and stamped some patterns into it with water to give a faux bleach effect.  I stamped a crackly pattern over this before adding my main images.

The monastery, bats and spider are by IndigoBlu and the foliage is a stampotique stamp.  The sentiment is heat embossed in vanilla white and then mounted onto purple card which I had embossed.  I outlined the edge in gold and fixed it with 3D silicone glue.

I used glossy accents on my spider to make him stand out.

I am really pleased with the way this card came together ... hope you like it too! 

Spookily yours ... x

Wednesday 9 November 2011

Heart Bookmark

 
I made this little bookmark on a stand at the craft show I visited at the weekend.  They were demonstrating their range of acrylic craft paints and also 3D dimensional paints so you could create whatever you wanted using their products.

I was really impressed with the craft paints as they give a lovely chalky finish and far less expensive  compared to some other chalk-finish paints.  I bought a few colours to try but may well get some more once I've had a play.  

The background was greated using a drag of the paints with an old credit card for a spatula and then I added texture with various bits and pieces eg bubblewrap, sequin waste etc.

I drew my hearts in dimensional paint and infilled then with craft paint which I built up a little for texture.  I painted the little die cut hearts and stuck them one to complete my heart theme.

I added the ribbon trim back at home and voila!  

Footnote: Anyone got any suggestions for using a bookmark with a Kindle?!!! LOL  xx

Rafia Challenge Week


Farming is the theme for this month at Gingersnap Creations and this week is all about Rafia.  I haven't used it before in any craft project but actually it is really easy to work with and there are loads of ways of including it.  If you fancy seeing some of these ways, pop over to Gingersnaps as my fellow DT members have all come up with a different idea.

I decided to make mine into wheat sheafs which I then painted with acrylic ink and used liquid pearls for the seed heads.  

My gorgeous Maritime Dame is from a new set by Lynne Perrella for PaperArtsy.  I bought her at the weekend at the Hobbycraft Show at the NEC in Birmingham and I had to get her out onto paper as I think she is amazing.

I also incorporated my favourite fish from Art Journey.

Thanks for visiting and hope you like my take on rafia and feel inspired to enter the fun!

Whatever you do this week ... keep inspired!!  x

Thursday 3 November 2011

Luggage Tags

I'm loving making these tags and today I've made them in three themes.   

Not for any particular reason, just because!!

So here they are ... BEACH

I love shells and everything beachy so I made these using sand with glitter in it and little miniature shells.


THINGS WITH WINGS ...

I can't resist all the lovely birds and butterfly imagery and so these incorporate some of those.


and finally ...  HALLOWEEN

Probably my favourite festive event (so long as it's not done too creepily!!).  My halloween fairies are just spooky enough to capture the flavour and I coudn't resist a little line of black pom-poms to finish them off.


For anyone who hasn't viewed my earlier tags, do hop to Harmony Road Studio as the idea for this project is Leslie's!

 Keep arty, keep crafty!  x

Wednesday 2 November 2011

Chocolate Box Cottage

OK ... half term is over and I have time to create again but before I post my new luggage tags, I thought I would share some of my photos of Rose Cottage in the Isle of Wight.


How gorgeous is this?  

Not only does it look like the front of a chocolate box but it also has a massive garden.  

There is a stream with a little stone bridge over it where the kids can take their nets and float boats.


There is a miniature lake with a gingerbread house, complete with a rowing boat called The Tadpole where you can sit and enjoy a cuppa.


And these girls are the biggest hens I have ever seen!  They have big fluffy legs and even more impressive is their big feathery feet.  They are just FAB!


We did treasure trails, bubble blowing and garden games but learning how to make your own bow and arrow with their Dad was one of the highlights for the boys along with seeing whose arrows were the sharpest and went the furthest!! (It's definitely a boy thing!)


Pumpkins carved and ready for lighting ....


But the best part of the week is seeing the children learning to value time with each other which is, for us, what being a FAMILY means. 


Hope you and yours also had a great week ...   x

Wednesday 19 October 2011

Never More


The new theme at Gingersnap Creations is the famous poem, The Raven, by Edgar Alan Poe.  The word 'nevermore' features many times throughout the verses and so as a play on that, I decided to split my word up as my poor man is definitely Never More!!!

I used stamps by Tim Holtz and Green Pepper Press to create the grizzly scene and I inked and masked the background with distress inks and dylusions sprays.  A splat of gold acrylic grunged it up a little more before the swirls (In My Words by Fancy Pants) were added.

I used an ideology acrylic chip for the title and a skull charm to finish it off - lovely and creepy!!

As Halloween is upon us, why not see what gruesome images you can find in your stash and join in the fun?!!

Keep craftful (is that a real word - I'm not sure?!!)

x

Monday 17 October 2011

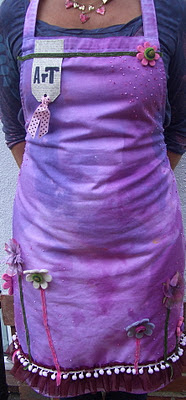
Apron.ology

I have been interested in having a go at Apron.ology (as named by Stampington & Co!) for a long time.  Well, actually since doing a canvas album a couple of years ago, which involved me trying to work in harmony with my sewing machine with whom I have  a love/hate relationship (I love it and it hates me!!)

I knew my retreat this weekend would be really messy so I decided that if any time for a new apron was upon me, this was it!!  

I headed off to the shops with an idea in my head and before long I returned with a crisp white apron and various threads and ribbons.  I hung my apron in the garden on our decaying tree house and sprayed it with Adirondack color wash.  I love their colours but I have to say that most of the depth washed out in the first rinse (despite serious heat setting) and my tumble dryer needed quite a bit of remedial work before using on the family wash (thank God the boys' rugby kit is black)!!  However, I was undeterred ...

I did a second spraying and rinse which did increase the depth but I would still have like to have achieved more colour density. 

Once dry for the second time, I got my sewing machine out and sewed all the frill, bobbles and stems onto my apron.  I used metallic thread which looks great on the apron but is a NIGHTMARE to machine sew with as you cannot get it to thread through the needle without removing the needle from the machine and using a threader.   In future (note to myself) DO NOT USE THIS THREAD!!!

The next day I was sat in the hospital with my eldest son who needed an operation so whilst he was in theatre, I sat and sewed the flowers and seed beeds onto my creation.  Found it really satisfying and for a non-sewer, remarkably relaxing!

Despite my mini-traumas with this project, I would recommend Apron.ology as it is  different and fun and the best bit is ... you get to WEAR your ART!!!

Keep crafty (it's the only way!!)  x

Art


I'm really pleased with how these little tags have turned out.  A lovely friend, Lesley, who lives in Canada posted a fantastic tutorial on her blog.  I loved her idea and wanted to make some but we don't have counter top samples in the UK (well not that I could find).  So I got in touch with her and she mailed some over to me - how kind is that?!  

If you want to see how to make these or any of her other lovely projects, hop over to Harmony Road Studio.  The tutorial is a little while back to click here to go directly to it.

I made my tags to give to a couple of good friends of mine who I was meeting up with this weekend.  The images are by Diva D'Este and the beads are Beadazzles (which I love!).

Thanks for visiting and hope you all had a great weekend. x


Wednesday 5 October 2011

House of Horrors


A departure from both my normal style and theme but this month at Gingersnap Creations is all about mystery and the macabre in the style of Edgar Allan Poe.

I don't really do horror - the oddest things in my craft room are my Stampotique stamps with their weird faces but I did have this old photo I picked up last year in a secondhand shop.  I think it was taken of an old stage set but as it was so unusual already, I thought I could alter it to make it into my House of Horrors!

It was really fun to create and I had to look far and wide to find bits and pieces which were small enough to use.  

If you are feeling mysterious or macabre (not sure that's good?!!) then why not see what you can come up with and join the challenge!

Keep an eye on the art in whatever you do ...   x

Tuesday 4 October 2011

Beach Day


I love the beach! I'm drawn to shells, beach huts, mermaids and fish - in fact anything connected with the beach.

I recently ordered a beach house kit by Bella Creations and I decided to combine some of the elements from the kit with a seaside stamp set by Crafty Individuals and a few other bits and pieces from my stash.

I had a great time playing with all these lovely elements to create my very own beach scene for my beach babe to cool off in!

Thanks for taking the time to look. 

Happy crafting! x

After 39 ...


No, I'm not a fan of spiders either but Mr Stripes is way cute!

This is my entry for the challenge this week at the Stampotique Designers blog.  It is entitled SDC38 Humorous Birthday and is a stampotique only week so only their stamps are allowed.

I've had the web for some time but Mr Stripes arrived this week (he had been languishing on my wishlist!) so I wanted to get him out to play!
I created my background using alcohol inks first and then acrylic paints and perfect pearls mist in heirloom gold so it does have a shimmmer (hard to pick up with a camera!).

Thanks for visiting ... hope you all have an artful week.  x


Wednesday 28 September 2011

Stand Side By Side ...


What a fabulous image!! 

When I saw it, it jumped out at me and I just LOVED it!!

Viva Las Vegas Stamps are our sponsor at Gingersnap Creations for all of September and this is one of their stamps.  This week it is a colour theme so no prizes for guessing the palette ... Blue, Turquoise and Purple.  I love those colours in combination so this was always going to be fun.

I built the background up with alcohol inks (which I am getting to love more and more) and then used acrylics with stencils and stamps.

Confession time comes next ... I intended to stamp my image in a very pale area I had built up and which I had blended to a perfect fade.  Disaster stuck however when my stamped image turned out imperfect :(   Well, it happens - so plan B swung into action and it all turned out good in the end.

If these colours appeal to you then why not put them together and join in the challenge - how you use them is up to you and we always love to see what everyone comes up with!
xx