Tuesday, 30 July 2013
Always Have a Shell in Your Pocket ...
What a fantastic challenge we are hosting this fortnight at Tiot!! The topic is 'Collage With a Twist' (which must include some script). Really couldn't include more options so this is probably one of my favourite DT creations because it was so easy ... in fact the hardest thing was choosing which of my ideas to follow!!
I decided to make a little tile on corrugated card about the seaside. I live about 2 minutes walk from one of the most beautiful beaches in the UK and have always been MAD about shells and anything seaside. This will be going up in the kitchen next to the hook with our beach hut key - perfect!
I used pale blue acrylic paint as a base on my corrugated card and then added a layer of Crackleglaze by Applicraft which is my new favourite product of the moment. You paint it over dry base coat and once its dry, quickly add the top coat (in one direction only and with minimal brushing) and the cracks just appear like magic.
I stamped my postage mark down one side and added the netting which I painted with white acrylic paint. All the elements are by Crafty Individuals and I stamped them with Staz-on and then tinted them with chalks.
I added glass bead gel around the feet of my lovely bathing beauty and some strips of vintage dictionary defintions plus few shells and my little montage was complete.
I hope you feel inspired to join in the collage fun with us. Check out my other DT gals as they have also created some beautiful pieces.
Enjoy!
x
Tuesday, 2 July 2013
Moments Are Special
This fortnight, the challenge at Try it on Tuesday is to 'Show Us Your Metal'. Another great subject as it's so open to interpretation and most of us have something metal in our stash.
My DT piece is a little different from the image on the site as I to confess that I have tweeked it a bit (not sure that's really allowed but needs must!!).
 I had the basic idea of what I wanted to do (which frankly is a rarity for me!!). I made time last Friday to get myself organised so that I could attend my local crop run by David and Brenda of Craft Obsessions. I had such a nice day with some really lovely ladies so I hope to try and become a regular attendee (it's my pesky kids & all their sports that get in my way LOL!!).
So, I got my photo blended into the paper and was very happy with how it all came together until I photographed it!! Aaagh!! Due to the way cameras flatten your work and lose the dimension, coupled with the colours, my piece suddenly looked like Halloween had come early ... not what I wanted at all.
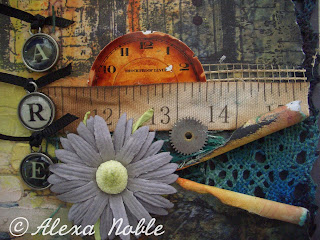
 Too late to change the upload but I decided the best option was to add some softer elements ie flowers to hopefully break the spell. It definitely looks less halloweeny and I am happy with it as it doesn't have that look in real life.
I used a background paper from the Tim Holtz Lost & Found range and a main paper by 7 Dots Studio. I dyed my lace using Dylusions sprays and arranged it to peep out around the edges and between the torn areas. I used distress inks and paints on all the curled areas to highlight them. The doorways were stamped with a Lost Coast stamp which I tried to line up a little with the background of my photo. A few drizzles and drips of acrylic ink to add some interest and a bit of lace stamped in the corners finished stage one of my page.

For stage two, I used light molding paste to blend my photo into the background with either smooth finish or with a brickwork mask. Once dry, I dry-brushed acrylic paint over the areas until they blended in.
I created my bookplate from grey card which I painted with acrylic paints and rubbed in gilding wax to make it look like a patina.
I painted the lovely railings with acrylic ink and arranged the other elements around the page.
My metal elements are the key (tinted with black and blue alcohol inks), the clock face (caramel and lemonade alcohol inks used on this), a small cog from a pocket watch, the letter charms and the brads on the faux metal bookplate.
Pop over to have a look at some of the other metal projects the TioT Team have come up with and get inspired to delve some metal out from your stash and join in the fun!
Hope to see your take on this challenge.
Have a great week ...
X
Subscribe to:
Posts (Atom)

