Disclaimer

"Some of the products used on my blog may have been provided by the vendors mentioned in my posts."

Friday, 2 March 2012

Mad Hatter's Tea Party


The sentiment is so true of this card ... it was due to be mailed in January as part of a Postcard Exchange!!

I've sent my apologies and it's heading across the pond today so hopefully Jacques will finally get it next week.  

I love Alice and bought The Mad Hatter's Tea Party stamp set some time back but I haven't used them until now.

The whole card has a silver pattern stamped across it which hasn't come out (despite many attempts at re-photographing it!) which really looks lovely - but you'll have to take my word for it!

I'm off to make my March card so I'm not late AGAIN! xx

Thursday, 1 March 2012

Twinchies


I went on a retreat a couple of years ago where we spent time with a professional photographer in the hotel gardens playing with fairies to learn about setting the scene for your pictures.  During the weekend I re-discovered my love of fairies and other magical things that I always had as a child. 

How many things which we loved as a child do we lose as we grow up without even realising it I wonder? 

I love to be able to play with a little magic in my creativity and the Twinchie exchange being hosted by Gingersnap Creations was an ideal opportunity for this.

I ended up making 7 of these fun little minis although only 6 were needed to be sent off in the mail for the swap.  I really like how they came out and hope whoever receives on of them likes a bit of make-believe in their life too!

Just got to wait now to see what arrives in the post over the next few weeks ... exciting!

xx


Wednesday, 29 February 2012

Getting to Grips with a Camera!


I have had a digital SLR camera for several years and I absolutely LOVE it.  But ... and it's a Big But ... I have spent almost all the time I have owned it shooting on automatic.


My photos have been OK but I've always known there was much more I could do.  I have had attempts at understanding the settings using magazines, websites, the manual it came with an even done a time-swap with a professional photographer who is a friend of mine.  All to no avail - the workings of shutter speed, aperture and depth of field have completely alluded me ... until now!!


We have one of the leading Arts University Colleges locally (very lucky!) so I enrolled on an evening photographic class.  We have a very patient tutor, Mark, who has de-mystified the workings of our cameras and I am finally getting the hang of it. (Thanks Mark!)


We have a competition at the end of our first term entitled 'After Dark'  so I headed off to a local wood which was being specially lit for one week.  It was spectacular and these are the images I captured.  It was my first attempt without Mark around to advise me and I'm really happy with my progress - let's hope he agrees as he's the judge for the competition!!
 
Enjoy your art. 

x

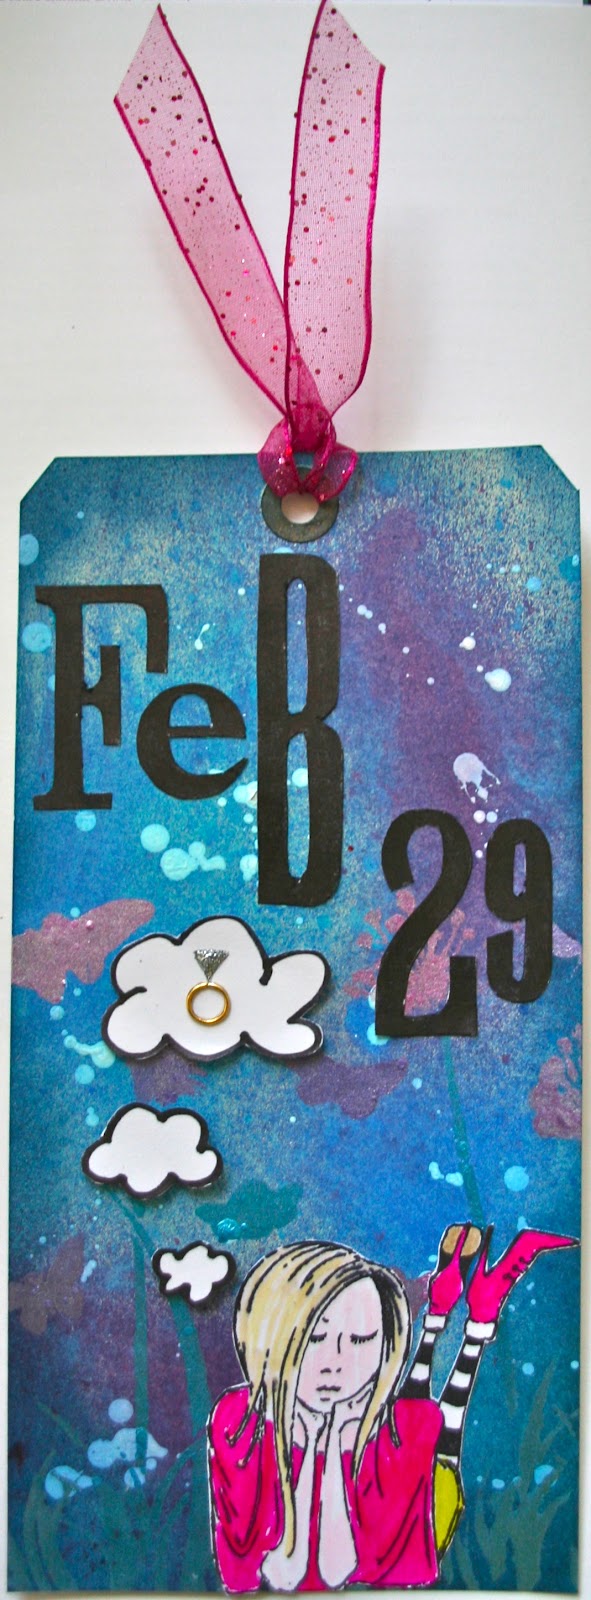
Dreaming


Everybody loves to dream don't they?  


I started off with frogs ... and then quickly got stuck! Having got no frog stamps or anything else really froggy or leapy I was fast running out of ideas until I realised that 2012 was a leap year!!  

Ta Dah!  Jasmin (Stampotique) popped into my mind as a dreamy kinda girl who may well be thinking of popping the question on February 29.  I inked my background with Dylusions sprays and them spattered white calligraphy ink randomly across the tag.

I used a Crafters Workshop meadow template with Stuart Gill Byzantia paints to create a very muted meadow for Jasmin to lay in.

The date was stamped using original printers letters which I then cut out and I created the ring with a jewellery jump ring and silver stickles.

I think this week's challenge will definitely get you all thinking.  Check out the other DT's take on it and get hopping into your stash!

Have a great crafty week ... xx

Wednesday, 22 February 2012

Butterfly Wishes


Our challenge this week at Gingersnap Creations is all about colour and GC140 challenge is Two Colors Only.

I love this plate by Art Journey and I decided to stamp it in Versafine Vintage Sepia.  It was a toss-up between coupling the brown with turquoise or with pink but you can see which one won!!

The smaller butterflies are also by Art Journey and the larger ones are by Lost Coast Designs.  I stamped them and then dipped them in beeswax which gives them a translucent finish which is lovely for fluttery things!

I added a little bit of glitter on my blue butterfly wings and also to highlight the spikes of the teasel head.

Have you got two favourite colours you fancy using for this challenge?  Why not try a combination you haven't thought of before?

Whatever else happens ... keep crafty! x

Thursday, 16 February 2012

Fly


This month it's all about faux techniques at Gingersnap Creations.

This week, the challenge is GC139: Random Redhead Challenge - Use a Faux Technique.  My technique focus for this card was faux bleach which I used to create my butterfly (Indigo Blu) but I have also mounted it onto a background which has a Spanish leather effect applied to it. 


I will be putting a tutorial onto the Gingersnaps site on Saturday to show you how to create this dimensional element so be sure to check that out if you like the effect.


The sentiment is by Stampotique and I added a small bead to bring the card together.

Hope you get time to join in this week's fun but whatever else you get up to ... stay crafty!  x

Wednesday, 1 February 2012

Birthday Wishes


I've had a great time making this card for a good friend of mine.  It's her birthday and I wanted to make a card more along the lines of art journalling.

I can't take the credit for the design as it was inspired by a photo of a canvas created by Donna Downey (wish I could dream up such fab ideas!) 

I started with a page torn from Lady Cottington's Pressed Fairy Book which has great script and I added the photo of the girls which is one I have on my computer is one of my favourite images. 

I used gesso either 'neat' or diluted across my page in a very random way and them did the same with a turquiose acrylic paint (I used Lagoon by Dyan Reavely but any other would be fine).

I cut my bunting from a sheet of type canvas and punched eyelets into it with a Crop-o-Dile.  I then painted the flags a bit with white acrylic before threading them onto the string.

My flower is by Prima and I used white acrylic to give it a bit more punch and blend it into my layout.  The stalk is also string which I painted with Lime acrylic paint.

I'm really pleased with the end result and hope it is well received ...
Thanks Donna for inspiring me!  x

Words of Wisdom


I decided to go vintage this week with my DT entry for Gingersnap Creations.  We are concentrating on telling it like it is and this week we are concentrating on Words of Wisdom ... and there are certainly loads of them to choose from!

I had the picture of this cute little girl in my stash and decided she would lend herself beautifully to my words of wisdom.  I used Prima botanical collection paper for my background and them layered my other items to make a vintage collage.  The tag was made by first screwing it up and then ironing it back flat again before inking it with distress ink and spritzing it. 

Maybe you have some pearls of wisdom you could share with us all by joining in this week's challenge?  I hope so as it's great to see everyone's work.

Have a crafty time whatever you do ...  x

Wednesday, 25 January 2012

Fabulous


Well, how lucky are we this month?  At Gingersnap Creations, we are being sponsored by Stampotique which I am SO excited about as I love their stamps (and have a drawer full of them which are my guilty pleasure!!).

This week is Gorgeous Greens and so I immediately decided on one of Janet Klein's gorgeous flower girls.  I have used Hiya Cinth who is just lovely with her dainty little shoes, big green leafy collar and immense hair ... or is it a hat?  Either way, I love her!
 

I've created my piece on canvas using watercolour for the background and loads of water.  All the stamps are by Stampotique and the great thing about many of their stamps is that you can use them either way up to create different things.  My glittery flowers are made from a banner of dangly hearts but they work just as well in Hiya Cinth's garden I think.


Why not see if you can feel a little green -
it's better than feeling blue after all!

x

Saturday, 21 January 2012

Altered Jars


This month at Gingersnap Creations it's all about getting organised and our focus is on using scraps which I'm sure you all have LOADS of if you're anything like me!  I have done a tutorial on using scraps with stamped images and also using them with cutting machines.
I decided to alter a couple of jars which I had left after Christmas (so they were scrap also!).
If you'd like to find out about this technique, go over to the Gingersnaps website for full instructions.


Wednesday, 18 January 2012

Bla Bla Bla


Favourite paper is the theme for this week's new challenge at Gingersnap Creations.  We are very luckily being sponsored this month by Stampotique Originals stamps which, if you are not familiar with them, are a gorgeous range of stamps designed by some uber talented people.
This tag features the Giant Shroom (by Jo Capper-Sandon) and is one of my favourite stamps as I'm a bit of a fan of all things from Fairy-land!

I coloured my tag using pastels before arranging my lovely toadstools on top.  I used a gorgeous paper by Flair Design called Love in Bloom for my toadstool tops and some white enamel for their spots.

Sitting nonchalantly on top of his toadstool is Quasimoto 5 who is by Jill Penney & Daniel Torrente.  A cute bug he certainly is and one that can be placed on lots of different objects in a couple of different poses depending on his mood!

The Bla Bla Bla sentiment is also by Jill Penney & Daniel Torrente and is another really versatile stamp that always makes me laugh and brings your little characters to life.
 
Why not search your stash for a favourite paper and join in the fun at Gingersnaps?  It would be great to see what you come up with.

x

Wednesday, 21 December 2011

25


So this was the perfect theme for a Christmas tag and the perfect way to use my Halloween Alterations  Die, Candlelight Fright, in a different way.

I inked my tag with Barn Door and then clear embossed it all over with a baroque style design.  This month we are very fortunate to be sponsored by Penny Wise Arts who stock a massive range of beads and sparkles for crafters so I used their black glass micro beads over glossy accents to bring out the swirls in my embossed background.

I painted my candelabra with crackle paint and used beadazzles for my flames.  

The numbers are cut from Ranger's Foil Tape which was embossed using an embossing folder.  The foliage was cut using Festive Greenery alterations die and distressed with the damask embossing folder.  I cut the snowflake in acetate and used a Star Dust stickle around the edge.

A little bead trim and some ribbons completed my tag - all ready for the challenge and for Christmas.

Hope you and your families all have a very Merry Festive Time.  xx

Friday, 9 December 2011

Dad


Cards for Men ... Don't you just hate trying to get some inspiration? (or is it just me?!!)  Half your stash is totally inappropriate ... hearts, flowers, beads, butterflies, fairies ... well I could just keep on going!  Even those men with a hobby must get tired of getting cards with golfers or mechanics on every year.   

My Dad's main hobby is restoring vintage cars but I did him a card with a car on last year - Tim Holtz's Old Jalopy to be precise so I needed to come up with something else.

Anyway, I decided to keep it simple and I'm actually really glad I did as I think this has worked out well.

I hope you agree ...

 x

Birthday Wishes Box

It's my Dad's birthday and there's absolutely nothing he wants!  We've exhausted all the clothing options, hobby supplies and theatre breaks so I decided that I would invest my time in creating his gift as my way to give him something special.

I have made him two batches of fudge - one chocolate and the other rum and raisin.  I bought an oval box from a local home store and although it was very nice, having a vintage photo of the Eiffel Tower, it has had a makeover!  

My Dad restores vintage cars as one of his hobbies and so that was my theme.

I painted the box with craft paint and then used stencils and Dylusions Sprays to create patterns and backgrounds (should have worn gloves and I now a couple of blue fingers!). 

I used images from the Dover 'Old-Time Transportation' CD to collage the box using Mod Podge.

I added the lace and spotty ribbon and used my Birthday Wishes stamp on the ribbon which came with the box.

I made a key fob with an old watch face and a circular tag from my stash (sourced from a garment I purchased).


All that remains is to fill the box with the fudge and send it to him.

Wednesday, 7 December 2011

Small Planet


This week the  challenge at Gingersnap Creations is GC129: Starry Night.  Our very kind sponsor for December is Penny Wise Arts who have a great range of fantastic beads and other cool stuff to get your creative mojo going!!

The idea for this piece came to me in the middle of the night and I then had to work backwards to create it.  I had a small bag of swarovski crystals in my stash which are SO sparkly that I decided they had to be the start of my starry night.  As they had pointed backs, I decided to use mountboard so that I could embed the crystals and achieve a flat sky.

I downloaded my earth from the internet and then cut my skyline using inspiration from a combination of buildings from various cities including New York, London and Hong Kong. 

I made the hollows for the crystals before covering my mountboard with Glossy Accents and pouring the black micro beads all over.  Once dry, I fixed the stars in position.

The buildings are all angled away from the earth and held in position using 3D silicone glue (which is one of my newer and much loved products!)


The final step was the sentiment; I had an intuitive feeling about the message I wanted but not the words to describe it.  Solution: put the task out to my in-house Design Team (aka the children!) and after a bit of brainstorming the options, I had my finished wording ... small planet ...   Big World ....   (thanks Max!)

Hope you feel like getting starry eyed and joining in the fun!

Stay Cosmic ...  x


Thursday, 1 December 2011

Every Life ...


I made this card for my brother's birthday.  Cards for men are always a challenge and my brother is no exception.  He's quite an 'off the wall' kind of character so I wanted something querky.  I found the image of the flying man and set about putting him into a context.

The line of cottages and tree are new stamps by Butterfly Kisses which I had in mind to make snowy shaker Christmas cards with.  However, they were also great for building this scene ...

I cut clouds from masking sheets and they brayered the background.  I stamped my cottages and coloured them in before fixing then to my card.  The tree and sentiment (Stampotique) were stamped directly onto the background.

I printed my flying man onto acetate and cut it to fit around the rooftops before sticking it down with a little glossy accents.  Voila! My man has taken to the skies for some peace and quiet!!

Hope it brings a smile to your face and also my brother's!

x

Tuesday, 29 November 2011

Silent Night


This is my first Christmas card of the season. 

I have to say that I'm not a huge card maker (understatement of the year!!) and I certainly have no desire to turn out volumes of any one card (I'm strictly a one card and move on type of girl!). However, all that being said, I thought it may be fun to try and make a card that I could enter into various challenges and see how I got on.

I found this personal challenge put me into a total creative void mid afternoon and at the point of abandoning this idea.  However, this evening things started to fall into place and I'm actually really pleased with this card.

I think it's good to step outside your comfort zone and see what you can learn from trying something new.  I hope to continue this journey ...

Take care and keep crafty x

Monday, 28 November 2011

The Girls


This week is a colour week at Gingersnap Creations and the challenge is GC128 Yellow, Red and Brown.  As we are also featuring livestock and farming this month, I knew this photo was perfect for the challenge.  These are 3 of the hens at the cottage we stay at in the Isle of Wight and they are just gorgeous!

I created my background with stencils, stamps, sprays and paints and I embossed little golden chicken feet criss-crossing the page which made me smile!


I used guilding flakes on the pencil tops for some glittery sheen and a jewelled swirl by prima for a bit more dazzle!!


The big butterfly is a stamp by Lost Coast Designs.  I stamped it onto old sheet music and dipped it in wax before colouring it with pastels and adding the wire antenna.


I hope my project has inspired you to enter this colour challenge - it's always great to see everyone's ideas.

x

Sunday, 27 November 2011

Magical Paradise


The main rule of the challenge is no Red or Green and it is also a Stampotique Stamp Only challenge.  Some of the ingenious ways that their stamps have been used is really cool so if you've time, why not hop over and take a look?!

I've used the little starfish stamp to make my tree and I've perched the large star on the top which I doodled some swirls inside.  I used little dots of stickles to decorate my tree.

I wanted a really watery feel to my background and so I used watercolour paper and Neocolor II watercolour crayons which are absolutely fantastic to work with as they are so soft and full of pigment.  I spritzed the finished background with marshmallow glimmer mist to give it a soft glittery finish.


My mermaid and octopii (?) are coloured with alcohol inks and are raised from the background for a little dimension.

I had loads of fun dreaming up how to use my stamps for this challenge.  Maybe you will feel inspired to be a little un-traditional too?!!

x

Saturday, 19 November 2011

Glass Bead Gel Tags

I have uploaded a tutorial onto the Gingersnap website to show how to make these tags.  

I love playing with messy stuff, and glass bead gel is so exciting!  I actually bought it from an online art retailer without knowing what it was or what I would do with it because it just sounded fun.  I wasn't disappointed as it is gorgeous stuff!


When wet, the gel is milky and the beads are hard to see but once it dries it is clear and the little glass beads are everywhere.  You can spray it with glitter, tint it with paint or spritz it with mica spray.

I decided to use it to create effects in apertures which I cut into large tags.

I made a seaside tag based around this lovely bathing beauty who I downloaded from Diva D'Este.

I created a wavy element at the bottom using the gel.


This butterfly tag has the gel all around the butterfly and is scuplted in swirls.  I decorated the tag with shimmer sprays, masks and paints.  The butterflies are beeswaxed and have idea-ology pen nibs for their bodies.  I used stamps by Lavinia stamps, Lost Coast Designs and Stampotique.