Disclaimer

"Some of the products used on my blog may have been provided by the vendors mentioned in my posts."
Showing posts with label Lost Coast Designs. Show all posts

Tuesday, 29 April 2014

Reeva


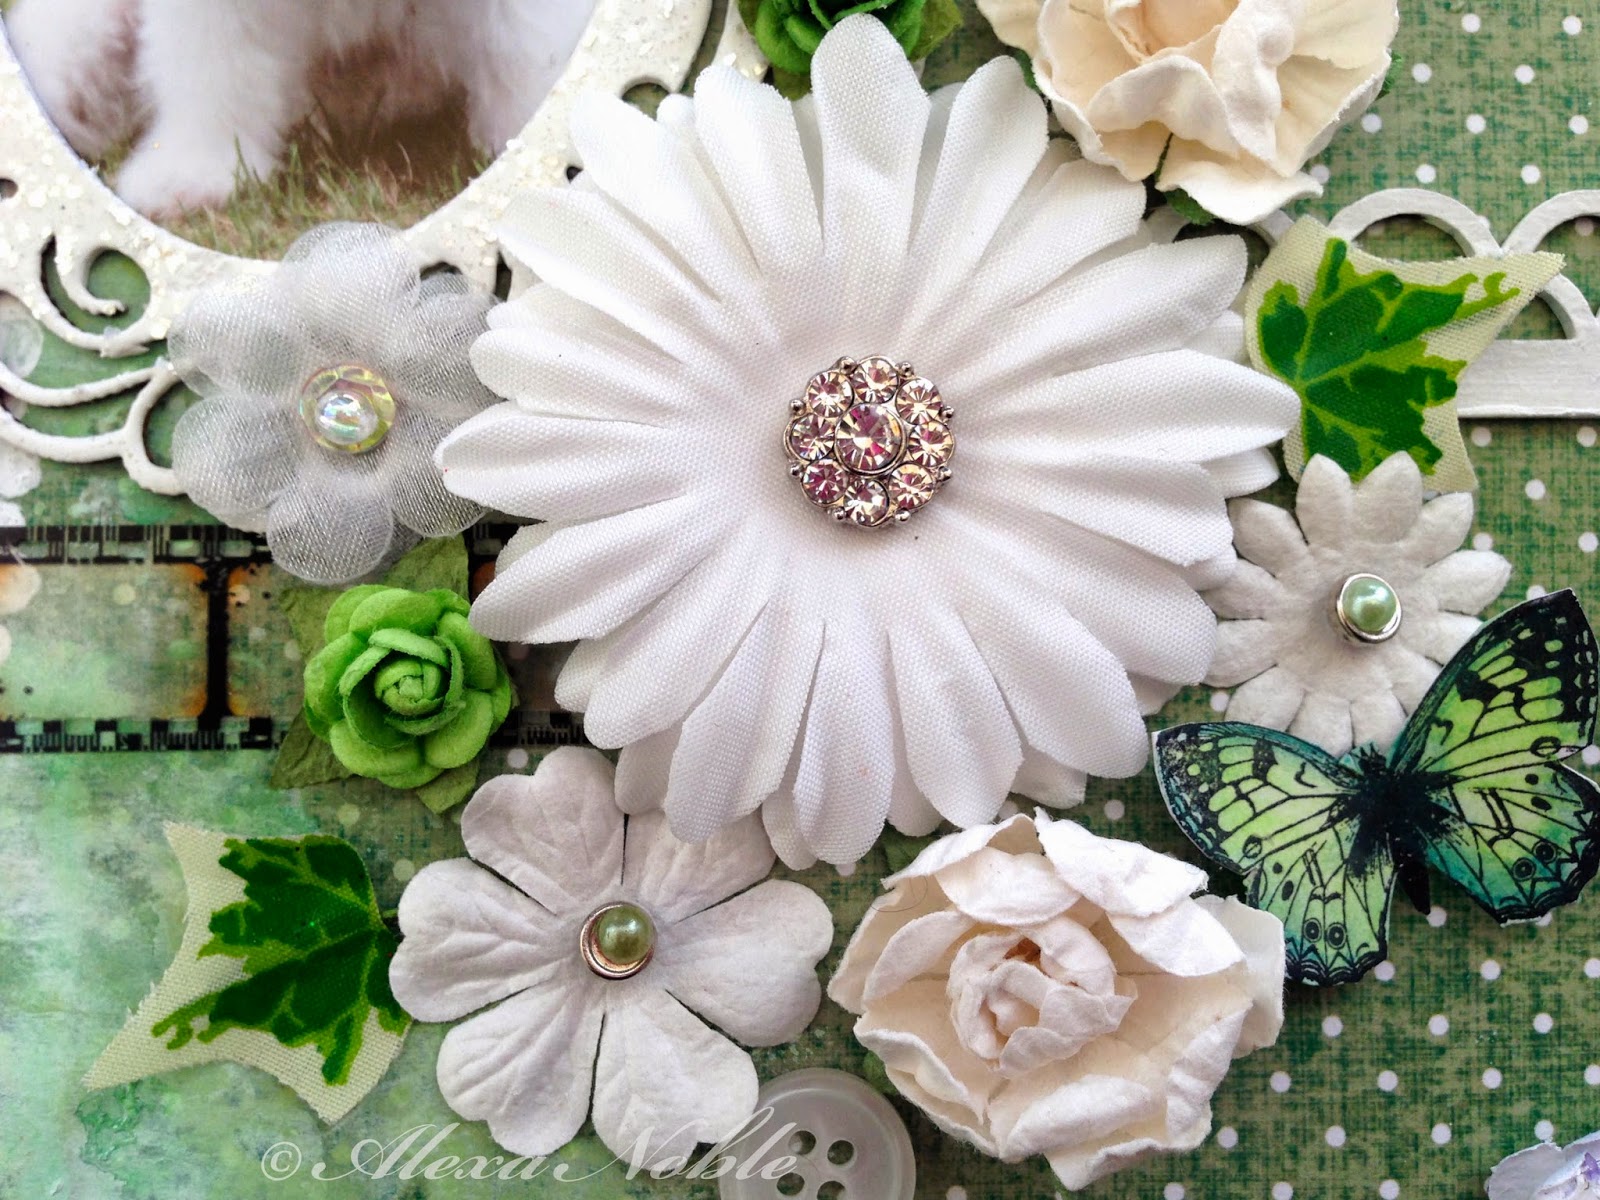
This was my second layout for Scrapbook Magazine using Dekromounts and featuring our new baby.

I embossed this frame with white power to which I sprinkled Frantage Glass Glitter for a good dollop of sparkle!

I added the Damask textures with a stencil and molding paste to which I then added some fabric in the edge and plenty of paints and inks, splats and more stencilling.
The title was hand cut, as were the butterflies which are by Lost Coast Designs.


I had the white sprig sitting in my stash for sometime and I knew it would come into it's own at some point.  It works really well on this page, coupled with the other white elements and the butterflies.


I clustered my blooms and added a little filmstrip and chipboard decorative strip for balance against the frame.  I used one of my special diamond brads on my main flower to tie in with the glittery frame.  The flowers are from a variety of manufacturers - I love Prima but they are not the cheapest so I always try to combine some less expensive options into the mix.  The little wired ivy leaves are really cost effective and add lovely colour and interest.


Thank you for stopping by ...

xx


Tuesday, 18 June 2013

Busy Bee


I created this page using a kit I was supplied with by Scrapbook Magazine.   I've never really gone for kits but I found that I really enjoyed using it as I had to focus on the best ways to use the various elements and how I could adapt them to suit my style.   For this project,  I was allowed to add other things but obviously the page needed to represent the kit so I tried to limit myself from a total stash raid!!

I added painted swirls to the backing paper and then heavily distressed the second paper using paints and inks and adding bits of vintage paper.


These lovely bees are by Lost Coast Designs.  They are a bit of a fiddle to cut out but worth the effort. I stamped them on vintage music paper before dipping them in beeswax - highly appropriate!


I used FlitterGlu and Copper Thunder gilding flakes with my honeycomb stamp to create their homes - lol!


I created my heart from some wired twine from the floristry wholesalers and added some acrylic paint to distress it.

The large letters are by Ten Second Studio which I embossed and painted with Stewart Gill paints.  The smaller letters are by Graphic 45 which are also embossed and distressed with paint.   

The pin and lace are from the kit.

I'm really pleased with the way this page came together as the colours really bring out the copper in Seb's hair and it's a rare shot of him standing and thinking and he's using running and darting!

I'm entering this page into the Creative Corner 'Recipe' Challenge - I used Lace, Metal and Paints.

Have a great week and thanks for popping by ...

X

Wednesday, 22 May 2013

WOYWW 207


Oh my goodness, I can't believe it's Wednesday already and time for WOYWW 207!!

I was very lucky to have been offered a job at the beginning of the year with an Interior Design Company.  This week we are busy getting a show home ready which great and I am learning so much.  We had ordered loads of styling pieces but the client had purchased a glass dome and we needed something to go in it.  I couldn't resist and volunteered straight away!

 
Yesterday I went to the florist's wholesalers to see what I could find.  I had already got an idea and needed driftwood but I found that they don't stock that and there's no time for an online order.  

Slight panic set in as the kids needed collecting from school and I needed a new idea fast!


I had a quick look around and grabbed a few possible options before dashing off into the school run traffic (always a good space to develop ideas as there's nothing else to think about!)


I decided to use an orchid stem and so needed to secure it to stand upright.  I used oasis which I needed to hide so firstly I covered it in a lovely brown web-like ribbon I had found.   I had also bought a beaded wire collar (designed to be used to make a posy) so I cut it apart and re-invented it to make cover my oasis.


The butterflies are stamped on old dictionary paper and the wire was sandwiched between then so they have dimension.  I curled the wires using my Fiskars Curly Thing (technical term - LOL!) and arranged them in amongst my orchid stem.


 Finished.

I'm really pleased with it but this morning is the moment of truth.  My boss gets here in 1/2 hour so we can head off to the house and finalise everything and so I have to hope she likes my creation ...


Have a great day everyone and happy snooping around everyone's desks.  I'll be doing my fair share when I get home later on today!!

xx


Sunday, 17 March 2013

Mother's Day


I saw this wire-work idea and was really keen to try it myself.   I am fascinated with birds' nests eggs and so the wrapped wire conjured up a nest in my mind which had to have some lovely eggs perched on it!!

I hadn't got any wire in my stash of the gauge I would really have liked so I had to make do with this thinner one which worked fine which was very easy to work (and hence very easy to mis-shape!!).

I painted my background on watercolour paper using acrylic paints and then acrylic inks and spritzed water.  I stitched my heart to the background with embroidery silk.

The eggs were tinted with alcohol ink onto which I glued the small wording printed from my computer.

The title was stamped with Lost Coast Designs alphabet in Staz-on Timber Brown and then distressed with Vintage Photo and Peacock Feathers.

I like this wire idea so there may be more to come ...

I'm entering this into the first challenge at the new site Country View Crafts blog - Challenge 1 - Pick 'n' Mix 


Enjoy your week ... xx


Monday, 11 March 2013

Closed


This layout is based on Wheal Peevor tin mine which is one of the many abandoned mines to be found all over Cornwall.  Their shape makes them very striking against the skyline so I decided to enhance this further using Lightroom.

I used my Gelli plate to create my background paper by adding the black and white pattern and the  purple and pale grey bands.  I then used an Artist Cellar stencil with molding paste (Golden) to create two panels in opposite corners.  Once the paste was dry I rubbed Viva Decor paste and gilding wax into them to give them colour and shimmer.

I printed the poem onto tissue paper and glued it to my layout with Mod Podge.  I have to confess its a lot easier if you have a set size and place for tissue paper items as my first couple of attempts resulted in torn paper!  Large areas of tissue are certainly tricky customers!

Anyway, once it was down, I moved on by stamping the window onto vintage map paper which I tore and inked with black soot.  The hinges which were cut from grunge paper, painted with black acrylic paint and rubbed with silver Inka-Gold.  The barbed wire (Dusty Attic) was painted black and touched up with a little copper Inka-Gold for a rusty effect.  The Owl is from PaperArtsy Hot Picks which I stamped and coloured with pencils.

I cut the flowers from vintage book pages using the tattered florals die by Tim Holtz.  I inked it up with broken china and black soot before adding a black crystal brad.

The black crystal swirl is by Prima and I added this with the stamped journalling ticket and my flower.  I perched my crows and added a key (Seven Gypsies) to complete this page.

This was the second of my three layouts which I entered in the National Scrapbooker of the Year 2013 competition in which I was a runner-up.

I am entering this page into Challenge 43 - Swirls at Fashionable Stamping.

Have a great week.  xx

Tuesday, 26 February 2013

Dandelion Clock


Time Flies.

Well, it couldn't be a more apt challenge this week at TioT!!  

Having just gone back to work after being a full-time Mum for a very long time, I'm running to catch up and time is definitely flying for me!  No time for commenting and visiting everyone's blogs (BIG apologies!) and a lot less time for the gym (oh dear!).

But, I love this new challenge so I guess I just need to speed up (LOL!)

So, back to the ART!  I love this challenge as there are so many ways to interpret it from clocks and wings to dandelions and growing families.  Whichever way it speaks to you, grab your stamps and inks and join in the fun ...  We love to see all the beautiful work you create.

This piece is part of a new journal I started to create on Sunday at an art journalling workshop.  I had a whole day to play with paints, tools and inks which should be heaven but I have to confess ... I was completely out of my comfort zone!   Having no idea where I am heading with the subject of my page and just creating backgrounds feels too random for my brain and stresses me out!  So, asI really want to embrace this way of creating I have set myself the challenge of continuing this journey and finishing the journal.  I think I will learn a lot on the way so wish me luck!!!

This page started off with adding a couple of tags and then painting it all with gesso into which I stamped some flowers and alphabets.  I then added a coat of Lumiere paint in Halo Pink Gold.  Some vintage papers and stamping came next before adding some Tattered Angels Glimmer Glam in Golden Goddess and Lipstick Pink. I highlighted around the tags with a black oil pastel which I blended with my finger.

I added the stamped images using Black StazOn.  The journalling was printed onto masking tape which had been painted with gesso.  I used Adirondack colour wash to colour them and some white acrylic ink which was largely removed with kitchen paper.

The cogs and clock face are vintage bits from old pocket watches.

I keep looking at my page ... I think I'm happy with it but it's away from my usual style so I'll see what everyone else makes (feedback welcome!)

Wherever you are, hope you are inspired to find time to stop the clock and enter in with the fun!

xx


Wednesday, 28 November 2012

Pumpkin Carving


For those of you who regularly visit my blog this page will be a bit 'deja vue' and you are right, this is second time lucky for my pumpkin carving page!  


I've been working on creating blended layouts recently where my photos fall into the background so the page becomes like one big canvas rather than having elements layers onto the page.  It's quite a tricky and time consuming process but I love the end result.  However, in trying to do the same with these photos, I realised it is almost impossible with multiple photos with very different colour schemes.


So to cut a long story short, whilst I thought the end result was not the best I've achieved, I thought it did work ok.  However, the photograph exposed all it's weaknesses and when I asked my family for their honest feedback ... well it wasn't exactly great!!  So, I've dismantled it, binned it and removed the post (my mother always told me to leave my disasters in the kitchen so I'm metaphorically doing the same with that page!)

This layout is more along the traditional lines but it does work better on this occasion - I hope.  It's not so much fun scrapping the same photos twice and I'm ready to move along, so I'm off to see how my next blended creation is going to turn out!

Hope you are all having a creative week ... x


Thursday, 4 October 2012

Listen to your Dreams


I couldn't resist this new Tim Holtz Stampers Anonymous Classics stamp.  The stamps create images that are like fine newsprint and stamp beautifully.    I also love my dream stamp, which another one by SA.


I started my card with a sheet of paper from the Bohemian range by Craftwork Cards.  I then stamped flourishes and the gothic windows.  The eye and mouth were stamped onto Lost & Found paper I added a little glitter to the corner of each using Copper Kettle and Golden Sparkle embossing powder.


I stamped my Dream centrepiece on another piece of Lost & Found paper and inked it up with distress.  I re-stamped it onto chipboard and cut out the 'D' which I also embossed in black.


I stuck the papers down and whizzed it under my sewing machine to add some further interest before fixing it to my card and adding the metal embellishments.  


I am entering my card into the following challenges:

Gingerloft Challenge GL49 - Stitching Real or Faux
Simon Stays Stamp - Glimmer & Sparkle


Tuesday, 2 October 2012

Woodland Bird House


I bought this MDF birdhouse last week at The Big Stamp Show held at Alexandra Palace in London.  It is actually a money box with a slot in the roof, but as I have no use for that, I covered the slot when I made my new roof!

The roof is covered with Ten Second Studio metal which I have embossed and sanded.  I wanted to add a decorative roof edging so I used Art Parts by Studio 490 which I painted and stamped.

I altered the entire birdhouse to look like white peeling weathered wood and I stamped leaves and flowers in chalk ink using some gorgeous new stamps by Differentcolors who are based in The Netherlands.  A few Lost Coast butterflies finished the background.  The picket fence is an alterations die which I painted with dabbers in two shades.

The birds and branch are by Maya road.  I painted the branch with acrylic paint and covered the birds in old text before tinting them using distress markers.  I added a small crystal for an eye and part embossed the larger bird with some Golden Sparkle embossing powder by Cosmic Shimmer which I got at the Show.  The little nest is from The Range;  it came in a pack of 6 around Easter time and I tinted the eggs with alcohol ink.  The butterfly is a download from Divas D'Este.

The final addition was the sentiment which is a Unity Stamp by Donna Downey. 

On this side, I cut some tattered florals in grungeboard and coloured them with distress inks before overstamping them with patterns.  The stems are made from a coffee spatula (thanks to Costa Coffee!) which I tinted with Walnut Stain distress.

The bee is  Stampotique stamp by Jo Capper-Sandon.
For the other side I stamped and cut out a tree by Stampotique and sat my crows, also Stampotique, on its branches.

It was really fun making this house, which is for my new studio.  I'm entering it into 'Lots of Layers' challenge on Try it on Tuesday, into 'Birds, Butterflies & Bees' challenge with The Stamp Man and also Challenge 3 on Anything But a Card

Have a happy day ...  x


Thursday, 6 September 2012

Seashells


We visited Lulworth Cove recently and took a clifftop walk.  The weather was perfect for walking and the views of Durdle Door were breathtaking.  

After the walk we strolled to Lulworth beach and bought some fresh fish from the little shop that sells some of the local catch.  I took this photo as we looked back up the lane through the village.

I created the background paper by layering and painting old sheet music and book pages which I then stamped and inked.

The filmstrip is an alterations die which I have cut from co-ordinations paper and sanded back heavily and added picket fence distress stain.  I used a paint colour selector card which I stamped with different mini stamps all by The English Stamp Company.

The street lamp is by Dusty Attic and the butterfly is by Lost Coast Designs.  The cottages are by Crafty Individuals.

Keep smiling ... the sun's out at last!!

x


Tuesday, 15 May 2012

Play


Everyone loves dandelions clocks as they are just irrestible - sitting in meadows with their large fluffy heads arranged in a perfect ball just waiting to be picked and blown into the wind!


I took this photo last year and love the way I managed to capture the individual seeds blowing in the breeze.


This page was created using tissue, lace, old music, old napkins and stamps all fused together with bondaweb.  I made a large panel and as it had several layers, I did need to use some gel medium to fix some of the elements together.  I stamped butterflies and alium heads randomly onto my panel and added a little tissue tape here and there.


Once it was all dry, I stitched is using metallic thread in the sewing machine onto my background paper.  Metallic thread is gorgeous but can be a bit of a challenge to sew with due to the metal elements in the thread so be warned - you need patience!!


I used a zig-zag thread pattern and I held the paper still in the machine at some points to create more interest in the stitching.


I layered my photo onto a page from an old children's book and popped a small doily behind before added a large prima diamond and pearl embellishment.  I extended the embellishment by cutting sections from another diamond swirl so it covered most of the page height.


I grouped my old clock face and fairy girl in one corner with my sentiment, and the layout was finished. 

x


Monday, 28 November 2011

The Girls


This week is a colour week at Gingersnap Creations and the challenge is GC128 Yellow, Red and Brown.  As we are also featuring livestock and farming this month, I knew this photo was perfect for the challenge.  These are 3 of the hens at the cottage we stay at in the Isle of Wight and they are just gorgeous!

I created my background with stencils, stamps, sprays and paints and I embossed little golden chicken feet criss-crossing the page which made me smile!


I used guilding flakes on the pencil tops for some glittery sheen and a jewelled swirl by prima for a bit more dazzle!!


The big butterfly is a stamp by Lost Coast Designs.  I stamped it onto old sheet music and dipped it in wax before colouring it with pastels and adding the wire antenna.


I hope my project has inspired you to enter this colour challenge - it's always great to see everyone's ideas.

x

Saturday, 19 November 2011

Glass Bead Gel Tags

I have uploaded a tutorial onto the Gingersnap website to show how to make these tags.  

I love playing with messy stuff, and glass bead gel is so exciting!  I actually bought it from an online art retailer without knowing what it was or what I would do with it because it just sounded fun.  I wasn't disappointed as it is gorgeous stuff!


When wet, the gel is milky and the beads are hard to see but once it dries it is clear and the little glass beads are everywhere.  You can spray it with glitter, tint it with paint or spritz it with mica spray.

I decided to use it to create effects in apertures which I cut into large tags.

I made a seaside tag based around this lovely bathing beauty who I downloaded from Diva D'Este.

I created a wavy element at the bottom using the gel.


This butterfly tag has the gel all around the butterfly and is scuplted in swirls.  I decorated the tag with shimmer sprays, masks and paints.  The butterflies are beeswaxed and have idea-ology pen nibs for their bodies.  I used stamps by Lavinia stamps, Lost Coast Designs and Stampotique.