Disclaimer

"Some of the products used on my blog may have been provided by the vendors mentioned in my posts."

Wednesday, 27 July 2011

Geevor Tin Mine


This is a page I have made for this week's challenge at Gingersnap Creations where we are focusing on steampunk all month.  We are very kindly sponsored this month by Dezinaworld and some of the images I have used in this piece were donated by them.   The title of the challenge is GC112 Iron, leather and Brass.

In one of my earlier posts, following my first foray into trying out steampunk, I said that I hoped to scrap my photos of our recent trip to the Tin Mine in Cornwall in a this style.  I hadn't realised when I said this, that I would get an opportunity to do so this quickly!  

A good friend of mine recently sent me the fabulous die cut clock which she has designed and cut out on a Pazzles machines.  It has sat on my desk for a week while I decided where to use it and then this layout sprang to mind.  

I inked the corners of my paper, which is by Pink Paislee, with distress inks to highlight the gorgeous damask masking.  I printed and cut out the cogs from a collage sheet by Dezinaworld and altered the large cog to make it a more open style gear.  I coupled these images with real cogs from old watches.

I cut my Victorian gent from a tag collage sheet, also by Dezinaworld and used more old watch parts to dress him in a steampunk style.  The moths and tiny dragonflies were stamped with Pumice Stone distress ink.

I created my title sign from grungeboard which I inked with distress ink and then dried with a heat gun.  I then re-inked it with Versamark and coated it with UTEE which I heated until it started to bead and then stopped.  This gives a faux leather effect which is hard to pick up with the camera but it really an easy and impressive technique which I would recommend everyone to try.  Tim Holtz (who else could have dreamed this up?) is the master behind this technique and there are several u-tube videos on it if you would like to see a clip.


My letters were cut on my cricut machine in dark grey cardstock to match the clock.  However, I had not thought through the faux leather colour and soon realised they would need to be pale to show up.  I decided to ink them with VersaMagic White and clear emboss them.  I was really pleased with the result as they actually look like tin - result! 

I ran them through my Xyron Quick Sticker but found that they wouldn't adhere to the faux leather finish. so some fiddly gluing was required!  


I am really happy with this page as it has all come together really well (hope you agree!) and it was fun.  It was a great place to visit and I had lots of great shots which I wanted to use.  Best of all, my friend who provided the clock for me lives about a mile from the mine so my page has a great local connection.


Happy crafting everyone! x

Thursday, 21 July 2011

Timeless Seas


I'm taking part in a postcard exchange which is going to run for the next 14 months.  This is my first card and is on it's way to Jeanie in the US (hope you like it Jeanie!).

Whoever is the recipient for the month gets to choose the theme or they can leave it as a free choice.  Jeanie has left it to each of us to decide and seeing all the cards that have been made and the variety is fantastic. 

I decided to indulge my passion for fish and clocks and do a sea theme using some new stamps by Chapel Road. They are beautiful as they look like real fish fossilized into stone and stamp beautifully.

I embossed the single fish onto the background and then inked all over it.  I stamped and cut out one fish and covered him with black UTEE and pale green crystals. I stamped the tag with the clock and then put all the elements together and added a couple of small shells which I hope will survive the mail!

These postcard sized pieces of art are really fun to create so I think I'm going to enjoy being part of this exchange.  :)

Wednesday, 20 July 2011

Smile & Wave!


Oh the fun I had with this page!  

The challenge this week at Gingersnap Creations is continuing with machinery and steampunk and is GC111 Trains and Planes.  Dezinaworld are very kindly sponsoring all the July challenges at Gingersnap and my airship image was donated by them.

A few months ago I bought two old volumes entitled 'General Knowledge Illustrated' from a secondhand book shop for £5.  They have lots of black and white image plates in them which I knew would come in useful for loads of projects and this fantastic background image is a prime example.

Once I had found it and decided to use the image of the couple on the 'airship' (can I call it that?!), so many funny conversations came to mind that that hardest part of creating my project was deciding that that couple would be saying to one another!

I studied the faces of my vintage couple.  The man is smoking on his pipe and waving, quite happy with his situation whilst his lady friend is looking rather more concerned at where they are.  By positioning them in a sky filled by a  plane being re-fuelled mid-air seemed the only appropriate course of action!!

I printed my image onto acetate and used an vintage typewriter (another recent purchase) to add the conversation which reads 

"SMILE & WAVE!" 
But suddenly taking to the sky in his marvellous flying machine seemed a little foolhardy ...


I used an embossing folder for the backing sheet and also for the cogs and I applied silver metallic rub-on to hightlight the texture.

One of my faster projects which I hope brings a smile to your face and encourages you to join us for the challenge. x

Wednesday, 13 July 2011

Escaping the Machine


This week the challenge over at Gingersnap Creations is GC110 Gears, Cogs and Watch Bits.  The whole of July's challenges are being very kindly sponsored by Dezinaworld and some of the imagery I've used has been donated by them for this project.

I bought my background machine image from a secondhand book shop which sells plates from old books.  I cut it out and then used an the steampunk alterations die to create my cogs.  I used black UTEE on them all and sprinkled a little embossing powder into the last layer.

I used the mini gears from the movers and shapers alterations die set to cut some further cogs in metal and metal mesh.

The wording is from a dymo machine and the winged wheel is by The Artistic Stamper.

I haven't done a steampunk layout before although I've always loved the style so this was fun to do.  I've got some photos of old mining equipment to scrap and I'm going to attempt to use a steampunk style on them.  If this turns out OK, I'll add it to the blog ... 

Hope this inspires you to join the challenge! Have a crafty weekend! x

Sunday, 10 July 2011

Tresco


This is another page for my Isles of Scilly album.

For this page, I printed my photo onto canvas and distressed the edges before fixing it to the paper.  I then tinted some Golden Molding Paste with acrylic paint before blending the edges of my picture into the background paper.  

 
Once the paste was dry, I created some more coloured pastes using inks and used them with various flower stamps to create textured blooms.  The best stamps for this technique are those which are deep cut and mounted onto wood such as the fabulous alium which is by The English Stamp Company and is one of my all-time favourites!  Once these dried, I stamped some flat images to finish the bottom of the page.

The branch and birds at the top were also created using molding paste and a Crafters Companion stencil.  

The title letters were painted with acrylic paints and some tinted glass bead gel.  The hanging tag is made using Vintaj brass elements.

Saturday, 9 July 2011

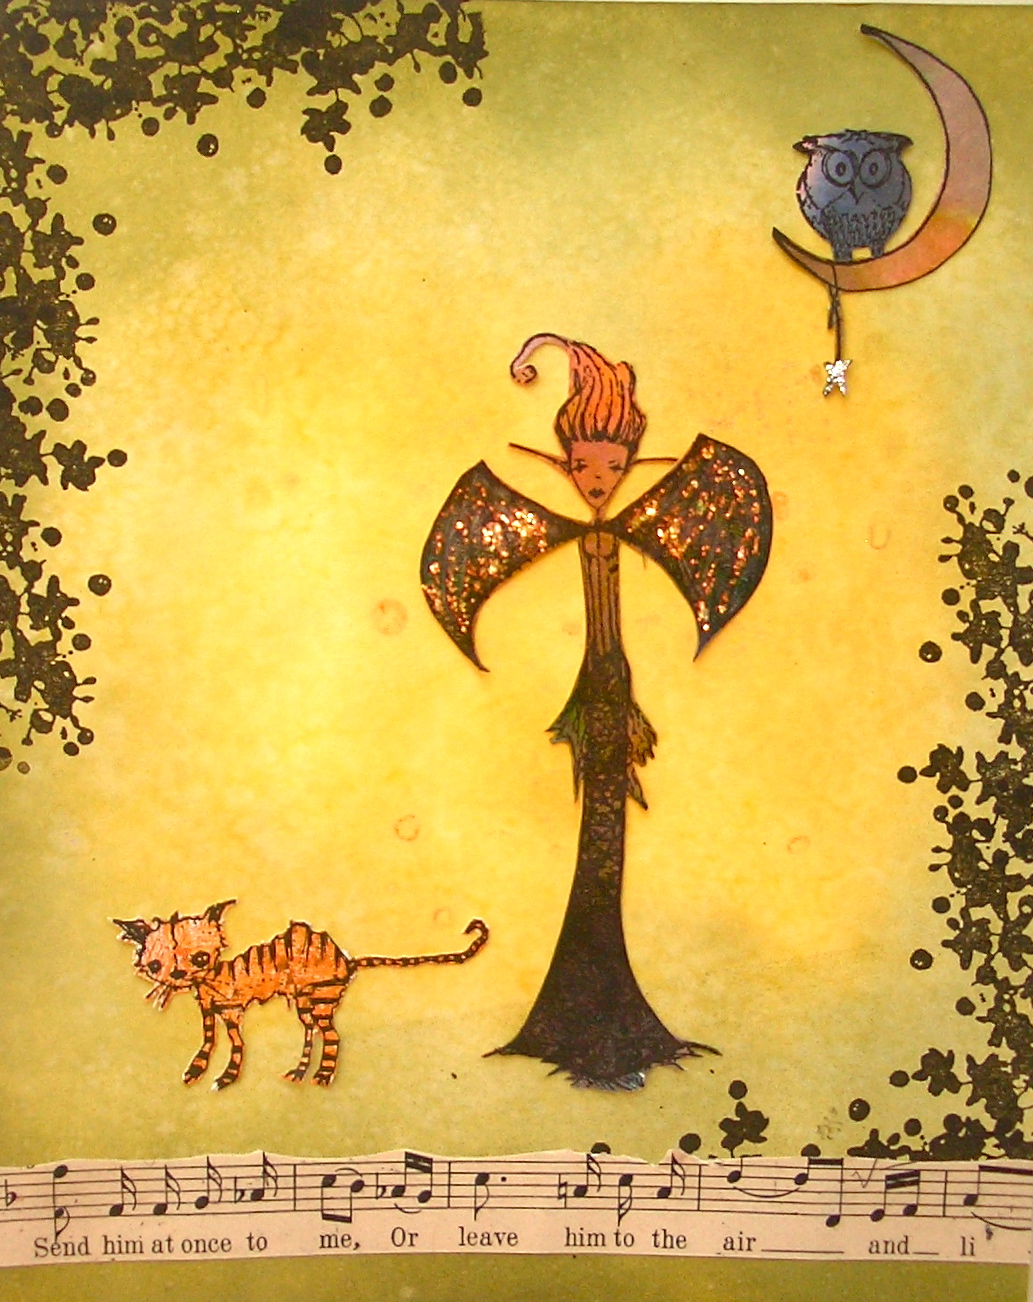
Send Him at Once to Me ...


This is my entry for the Stampotique Designers Challenge SDC33 Use Your Scraps.  There was a blog hop tour attached to this challenge with some prizes up for grabs but  I've been too busy to get my entry done in time for that!

Like most crafters, I've got tons of scraps.  Actually, due to moving house, I have thrown away some stuff (shame on me!!) and since moving, due to my new craft area being visible to all rather than being tucked away in the annexe, I have been throwing more bits and pieces away just to keep the area tidier!  However, suffice it to say, I still had more than enough stuff for this challenge LOL!!

As I started to rummage, I found some sheets of paper that I had used to experiment with some inky techniques.  I chose a piece for my background which was created with inks, water and rock salt and was languishing in the bottom of the bits box.  I then found another sheet which I had used lots of different inks on and then masked and sprayed with glimmer mists.  It had loads of different colours on it so I stamped my images in different areas before cutting them out.  I cut Kitty out from a sheet where the technique I had tried didn't go to plan (and I've a good choice of those!).

I was deciding on the sentiment when I chanced upon a leftover piece of sheet music which seemed to lend itself to my layout.  Job Done!

Hope you like my scraps entry -  if you are quick you could use us some of your scraps too as the challenge runs until 12th July.

Have a crafty weekend!! x

Travel Bookmarks Exchange


If you are following my blog or just popped by a few weeks ago, you would have seen that I entered the Travel Bookmark Exchange being hosted by the  Gingersnap Creations Group.

These are the book marks I received in the exchange and they are all absolutely lovely.  They came from Zoe, Emma, Valerie and Laura.

Thanks girls for creating such beautiful pieces!  x

Wednesday, 6 July 2011

On the Road


The theme for this week's challenge over at Gingersnap Creations is On the Road.

I started off thinking about transport and cars and briefly toyed with an idea using the Old Jalopy die by Tim Holtz but then my mind started to come in on the idea of the road of life and this photo lent itself perfectly to this theme.

It was taken in 2004 of the children ready to go to their new school. They all look so small and I don't know where the time has gone!

I created a road using Dylusions sprays and Glimmer mists with a variety of masks.  The hearts were free cut from my test spray page and the line of stars was the mask I cut to use in the road so nothing was wasted!

The tag is hard to read in the photo but it says "So the day arrives when they stand in their new uniform ready to start out ON THE ROAD to gaining an education and growing UP.  An important moment for us as parents and for them.

I'm really pleased with the simplicity of this page and hope you like it too.  :)

Wednesday, 29 June 2011

Love, Laugh, Listen

This is my card for the new challenge at Gingersnap Creations.  This week is a Blue Moon challenge so you can don't have to follow the theme for the month.

The challenge was 3 Words, 3 Papers, 3 Buttons. 

I love this stamp and so I cut my ladies out and dressed them in three different papers and decorated their hats to match.

I spritzed the background to loosely give a sky and sand impression and them painted the sandy area with glass bead gel which gives lovely dimension and glisten.

The buttons also doubled up as my words and with a couple of small corner flourishes, the piece was finished. 

Hope you like it and feel inspired to have a got at this challenge yourself - go on ... it's fun!

Tuesday, 28 June 2011

Avian


This is my newly completed page for my Isles of Scilly album.  The wildlife on the islands is far less timid than at home so I got some really close-up shots which was fantastic as I could capture just how lovely these birds are.

I scrapped the picture of the young thrush previously but wasn't happy with my layout so decided to start again.  The Islands are absolutely incredible and there are photo opportunities around every corner so of course, I just kept snapping.  I am trying to get my album finished so that all my shots of our trip are ready for us to re-visit but it's quite a big task!

I'm really pleased with this page now so that's another one closer to a finished album!

Thursday, 23 June 2011

The City That Never Sleeps


The technique for the challenge was absolutely that ... a Challenge ... well for me at least!  This was tag number 4!   The difficultly I had was getting the paint off the embossed areas once dry.  Either it refused to budge or the paper started to fall apart as I rubbed over the area - I just couldn't seem to master it.  I gave up yesterday and returned this morning to have another shot but this time I barely left the paint to dry before removing it.  Hey presto!  the images came through and the paper stayed intact - phew!  

Once the background was complete with the New York skyline at the bottom and the clock at the top, I had a wrestle with my Dymo machine.  Sir Tim insists that these machines will take normal paper but my little gadget had other ideas.  It took me ages to get my paper strip through the feeder and then it wouldn't move the paper on after each letter.  I got around this problem by manually pulling it through each time I printed a letter.  Obviously, this was hard to judge exactly, but it turned out OK and I like the idea of being able to use media other than dymo tape.

I've used a variety of other things on this tag - a glimmer chip wing which I inked with distress and spritzed with glacier glimmer mist; a small piece of film strip into which I punched a washer, an ideology pen nib wound with embroidery silk, an idealogoy hinged clip and an ideology philosphy tag.

The old pocket watch was re-glazed with UTEE into which some small watch bits and pieces were dropped. 

Hope you like it!

Wednesday, 22 June 2011

Money is the Root of all Evil


Over at Gingersnap Creations, the challenge for this week is the Colour of Money. The challenges this month are very kindly being sponsored by Altered Pages and some of my images have been provided by them. 

I dressed my mannequin with money - although this is hard to see as the stamp is so detailed. 

I wanted to tie this element in to the quote so I converted some tree branches (Maya Road) into roots.  I embossed them with clear powder before inking them with distress.

I backed this onto a collage of currency printed in black and white. 

Thursday, 16 June 2011

Fairy Time


Last October, I went to a scrapbook retreat in Cornwall and we had a day with a professional photographer in the beautiful grounds of the hotel.  She gave us each a gorgeous little fairy to play with and we had to pose her in the foliage and experiment with setting up a shot and capturing it.  My friend and I had great fun with 'Miss Whippy' as we called her, due to her hair being like a whippy ice-cream!!

I love these red hot pokers (knifolia) and when I saw the challenge, I knew that this was the page I wanted to scrap for it.

I created the orange background using old sheet music which I sealed with Viva Croco before using acrylic paint and stamps over it.  The 'Giant Shroom' is by Stampotique and I made it in Ten Second Studio metal.

The fairy stamps and leaves are by Lavinia Stamps.  I tore the squashed fairy plate from an old book and I stamped script over it.  The large flower is by Prima and the smaller ones are by Petaloo.  These come plain white for you to alter as you choose so I stamped mine with music and spritzed them to match the layout colours.

Hope you like my entry and make sure you have a magical day :)  x

Monday, 13 June 2011

For You


House move over - thank goodness!! - so back to a little time to be creative in between sorting the new house out.  

I made this little card for the Stampotique Designers Challenge SDC32: Clean and Simple

This challenge involves creating a clean layout with plenty of free space ie minimalistic.  I always admire this look as it seems so simple, but I actually found that it was quite a challenging to create.  Either my layout looked unfinished or I added one more touch and ruined the whole thing!  Trust me when I say that my new bin is testament to this (Uh Oh!)


Several attempts later, I finally got it right and this is the result.  

My little Gog Lin stamp was a present from my children on Mother's Day so it's really got a special place in my collection and this was his first outing!


Hope you all like him ...  x

Off With Their Heads


How fabulous is this?  This dropped through my letterbox in the middle of my house move and it was a such a welcome diversion. 

This was the work I received as part of the art swap run in the April edition of the Craft Stamper magazine.  The theme was Fun and Games with a colour scheme is olive, rust and cream, up to  5" square and it had to include a game piece.

The quality of the card is amazing.  Absolutely incredible amount of detail and beautifully put together.  It was made by Franka Benjaminsen whose blog I am going to try and locate to see some of her other work.  So Franka, if you ever come to see my blog - a big thankyou for making such a fantastic card - it's got pride of place on my desk!  lol xx

Happy Birthday


I wanted to share this beautiful card I received for my birthday from a lovely friend of mine.  I think this is the best handmade card I have ever received as it's Alice (so major points scored already!) and it's absolutely gorgeous.  

How lucky am I to have someone to take the time to create this me?  

The only downside to having such a talented friend, is keeping up with her when we go to retreats together -  she's not only uber talented but also super fast!! lol x

Wednesday, 1 June 2011

Ooh La La


When I saw the challenge theme, my lovely shopping diva stamp came to mind straight away.  I wanted to combine this with the use of old photos as this is becoming my favourite technique of the moment!!

I decided to transfer my background photo image to my card so I painted it with matte soft gel and applied it face down to my card before leaving it to dry thoroughly.  Patience is the key but once it was fully dry, I rubbed off the backing leaving just the image.  I used acrylic paints to frame it into the page.

I stamped my diva onto a transparency and coloured her in suitable shades for such a fabulous shopper!  Both the striped fabric and the pink ric-rac are from garment tags which also tie they in nicely with the challenge theme.

Sunday, 22 May 2011

Two Little Boys

This month is Wild West over at Gingersnap Creations and we've all been busy creating art which includes cowboys, cactuses and carts!!  

I've posted a tutorial to show how to create perspective background using a brayer.  If you've got a few minutes, pop over and take a look at it and get rollering!!

I've made this scene using the technique and put my two little cowboys in it to play.  Hope you like it and feel inspired to give it a try.  I'd love to see what fantastic art you come up with. x


Friday, 20 May 2011

Earth Laughs in Flowers


Over at the Play Date Cafe the challenge is based on a photograph and it's really interesting to see what this sparks in everyone's mind.  For some people, it's clearly the colour palette, whereas for me, it was the fencing that stood out and all I could think of was country cottage.


So, that's what I did ... I covered some card with Panduro fabric and let it dry before running it through my lovely Vagabond (thankyou QVC for offering easy-pay!).  I also used it to cut my fencing from Colour Core Cardstock (Whitewash Collection) which, if you are not familiar with this, is coloured cardstock with a linen finish and whitewashed.  If you sand it, the core colour shows through.  I love it as it comes in all different core colours and is really versatile, especially when embossed.

I then set about altering some existing embellishments I had to make my little house bloom.  The background card was painted with watercolour from pale green to pale blue.  A couple of stalks painted in for my sunflowers and it's finished.

Tag Thursday


What is it about today?  I've got the tag bug and cant stop making them!!

A couple of days ago I received parcel from Art Journey with some GORGEOUS stamps.  Normally, I'd get them straight out of the packet, mount them up and start stamping but creativity is running low (and time to create even lower) due to our imminent housemove :(  It'll be OK once it's done, but at the moment I'm the wrong side of done (if you know what I mean!).

Anyway, I decided that these stamps were too lovely to wait, so I've made these tags.   The backgrounds were created with Dylusions inks and I misted two of them with Marshmallow Glimmer Mist just to set off my stamps.

The shells are all stamped and painted with watercolours and are from Art Journey.  I love the urchins as they can be cut up into sections so are really interesting. 

The tag on the left has fish which I cut from the packaging of a fancy box of chocs I was given as a gift. The fatter fish are Art Journey.

My mermaids are, of course, Stampotique.

I will be mounting these onto cards tomorrow to use for some thankyou notes I need to send.

Hope you like my efforts ... I'm off to bed as it's late ... must remember to shut the cat in the Laundry Room or I'll be back here at 5.30am LOL!!